My family does not celebrate the Christmas holiday, but like
most people in this country, we do gather together with family and friends. This year Hanukkah came early and we were finished opening our gifts and lighting our Hanukkah candles by the time Christmas arrived. We may not recognize the holiday as our own, but we still feel the urge to get together and share a meal. This year my sister and her husband hosted a wonderful dinner party. They served prime rib with all the trimmings. To my dismay, they asked me to bring Bread Pudding for dessert. I'd never prepared this dessert and I was a bit nervous. For one thing, it happens to be my husbands all time favorite sweet and I'd never even had it before (so the pressure was on).. To top that off, he does not like raisins in his pudding, so I needed to find a recipe (or alter one) that would suit his taste buds (as well as please the rest of the family).. After searching my cookbooks/magazines and online sources, I ended up with a rather large collection of recipes and information on the preparation of this old and historical dessert.. Bread Pudding or "Poor Mans dessert" was originated in England, and it was really created out of necessity more than anything else.. It was really just a way to use up (and not waste) stale old bread (not the most appealing way to begin my research).. At any rate, I have to say that after making and (more importantly) eating this dessert, I now have a new found LOVE of this sweet, creamy, rich and rustic dessert.. It really satisfies the sweet tooth (to say the least).. It is a satisfying dessert I look forward to making for years to come.. So, now it's your turn.. Try this recipe for New Orleans Bourbon Bread Pudding and let your taste buds melt and travel to a little place I like to call Heaven... Don't forget to serve it with this wonderful caramel sauce (makes all the difference)..
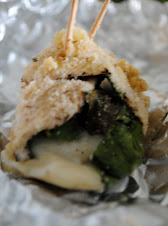
New Orleans Bourbon Bread Pudding
Serves 8 to 10
First be sure you have everything you need readily available. Also, be sure to read through the recipe before you begin. It will help you avoid making mistakes that could have been avoided (like I did when I forget to turn down the oven).
This bread pudding is great on its own, but for a little more punch drizzle Bourbon Sauce over individual servings. A bakery-quality French baguette makes this dish even better. I did not use bourbon sauce in mine because I was serving it to kids and the flavor would have been to strong. Instead, I used a fabulous home made caramel sauce (enjoyed by both kids and adults).
1
| French baguette (18- to 20-inch), torn into 1-inch pieces (10 cups)
|
1
| cup golden raisins [I omitted the raisins]
|
3/4
| cup bourbon [nope]
|
6
| tablespoons unsalted butter , cubed and chilled, plus extra for baking dish
|
8
| large egg yolks [just the yokes... cooking with just the yokes helps avoid curdling of the eggs]
|
1 1/2
| cups packed light brown sugar
|
3
| cups heavy cream
|
1
| cup whole milk
|
1
| tablespoon vanilla extract
|
1 1/2
| teaspoons ground cinnamon
|
1/4
| teaspoon nutmeg
|
1/4
| teaspoon salt
|
3
| tablespoons granulated sugar
|
1. Adjust oven rack to middle position and heat oven to 450 degrees. Arrange bread in single layer on baking sheet and bake until crisp and browned, about 12 minutes, turning pieces over halfway through drying time and rotating baking sheet front to back. Let bread cool. Reduce oven temperature to 300 degrees. [I used to loafs and forgot to turn the oven down for the first 20 min of cooking the main dish - oops! It still turned out yummy!!]
2. Meanwhile, heat raisins with 1/2 cup bourbon in small saucepan over medium-high heat until bourbon begins to simmer, 2 to 3 minutes. Strain mixture, reserving bourbon and raisins separately. [I skipped this part]
3. Butter 13 by 9-inch baking dish. Whisk yolks, brown sugar, cream, milk, vanilla, 1 teaspoon cinnamon, nutmeg, and salt in large bowl. Whisk in remaining 1/4 cup bourbon plus bourbon used to plump raisins. Toss in toasted bread until evenly coated. Let mixture sit until bread begins to absorb custard, about 30 minutes, tossing occasionally. If majority of bread is still hard when squeezed, soak for another 15 to 20 minutes. [I ended up soaking the bread for about 1 hour]
4. Pour half of bread mixture into prepared baking dish and sprinkle with half of raisins. Pour remaining bread mixture into dish and sprinkle with remaining raisins. Cover with foil and bake for 45 minutes. [I baked it at 450 for about 20 min. before I realized I'd forgotten to turn the oven down to 300 degrees. After turning it down to 300 it backed for another 15 minutes]
5. Meanwhile, mix granulated sugar and remaining 1/2 teaspoon cinnamon in small bowl. Using fingers, cut 6 tablespoons butter into sugar mixture until size of small peas. Remove foil from pudding, sprinkle with butter mixture, and bake, uncovered, until custard is just set, 20 to 25 minutes. Increase oven temperature to 450 degrees and bake until top of pudding forms golden crust, about 2 minutes. Transfer to wire rack and cool at least 30 minutes or up to 2 hours.
Caramel Sauce Recipe
Now for the Caramel Sauce!! I was so nervous about making the caramel sauce, but aside from a very tired arm/wrist, the process is really very simple and the results are outstanding!! I could eat the caramel right out of the pan (all of it!).. Store the sauce in a class bowl or dish and heat it up in the microwave when you are ready to serve it.
Drizzle the caramel over the warm bread pudding and serve (you can add ice cream or whipped cream as well). You and your guests will enjoy this sweet dish from beginning to end.. Every scrumptious bite will be savored.. Enjoy!!!
Ingredients
- 1 cup of sugar
- 6 Tbsp butter
- 1/2 cup heavy whipping cream
Method
1 First, before you begin, make sure you have everything ready to go - the cream and the butter next to the pan, ready to put in. Making caramel is a fast process that cannot wait for hunting around for ingredients. If you don't work fast, the sugar will burn. Safety first - make sure there are no children under foot and you may want to wear oven mitts; the caramelized sugar will be much hotter than boiling water.
 2
2 Heat sugar on moderately high heat in a heavy-bottomed 2-quart or 3-quart saucepan. As the sugar begins to melt, stir vigorously with a whisk or wooden spoon. As soon as the sugar comes to a boil, stop stirring. You can swirl the pan a bit if you want, from this point on.
Note that this recipe works best if you are using a thick-bottomed pan. If you find that you end up burning some of the sugar before the rest of it is melted, the next time you attempt it, add a half cup of water to the sugar at the beginning of the process, this will help the sugar to cook more evenly, though it will take longer as the water will need to evaporate before the sugar will caramelize.


 3
3 As soon as all of the sugar crystals have melted (the liquid sugar should be dark amber in color), immediately add the butter to the pan. Whisk until the butter has melted.
 4
4 Once the butter has melted, take the pan off the heat. Count to three, then slowly add the cream to the pan and continue to whisk to incorporate. Note than when you add the butter and the cream, the mixture will foam up considerably. This is why you must use a pan that is at least 2-quarts (preferably 3-quarts) big.
5 Whisk until caramel sauce is smooth. Let cool in the pan for a couple minutes, then pour into a glass mason jar and let sit to cool to room temperature. (Remember to use pot holders when handling the jar filled with hot caramel sauce.) Store in the refrigerator for up to 2 weeks. Warm before serving.
Makes a little over one cup of sauce.