Friday, November 27, 2009

Pumpkin Roll...

Looking for a wonderful holiday treat? Look no further! This Pumpkin Roll is simple to make once you get the hang of it and tastes divine. I made this dessert for Thanksgiving and gave them out as holiday gifts to family members. Pumpkin is such a wonderful flavor in desserts (one of my favorites) and this roll is a great alternative to pumpkin pie or in addition to pie... Seriously, why have one dessert, when there are so many sweet treats to sample out there! don't you agree? Enjoy!!!

Pumpkin Roll
Baking supplies:
Jelly Roll Pan, Mixer, Large Bowl, Wire Whip, Measuring Cups, Measuring Spoons, Spatula, and, Frosting tool 
Cake:
1/4 C flour
1 t baking powder
2 t cinnamon
1 t pumpkin pie spice
2/3 C pumpkin
1/2 t nutmeg
1/2 t salt
3 eggs
1 C sugar
Cream Cheese Filling:
1 C powdered sugar
1 8 oz. pkg. cream cheese, softened
6 T butter, softened
1 t vanilla
~~~~~~~~~~~~~~~~~~~~~~~~~~~~~~~~~~~~~~~~~~~~~~~~~~~~

1. (Preheat the oven to 375 degrees)
Put the eggs and sugar in a mixing bowl and beat on high for at least 4-5 minutes (it took me almost 15 minutes with my kitchen aid). You want the mixture to turn nice and creamy white (or very light yellow).
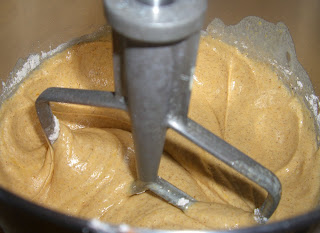
2. Add the pumpkin and mix until incorporated.
3. In a separate bowl mix the dry ingredients.
4. Add the dry ingredients into your mixing bowl and mix until well combined.
5. Pam & Bakers Joy sprays have flour added and are great for baking. Spray a little circle of it in the center of a jelly roll pan before lining. Line the pan with a piece of wax paper and then spray it with cooking spray. Not to heavy, just a light coating. 
6. Spread the batter out evenly over the wax paper. "Evenly" is the key here. You want it to be as smooth as possible.
7. Bake at 375 degrees for 15 minutes.


8. While the cake is baking, lay out a clean dish towel onto your counter. 
9. Sprinkle powdered sugar all over the dish towel.
10. As soon as the cake is finished baking, carefully loosen the edges with a knife and then dump it onto the dish towel.

11. Remove the wax paper.
12. Cut off any jagged edges.
13. Roll it all up! Set it on a wire rack to cool.

14. While the roll is cooling make the filling.
15. Beat the cream cheese and butter together for about 2 minutes, or until smooth.
16. Add the other ingredients and beat until smooth and silky.
17. When the cake is completely cooled, unroll it and spread the frosting evenly over the top. I only put a light layer of frosting on. The first roll I made was far too sweet.

18. Roll it all up again and lay it seam side down on top of some plastic wrap.
 
19. Wrap the roll in plastic wrap and then in tin foil.
20. Refrigerate for at least 3 hours. They freeze very well and make wonderful holiday treats to share.


Sunday, November 22, 2009

Tuscan Bread Soup


There are many recipe variations for Tuscan Bread Soup - made by Italian grandmothers everywhere. The recipe I use is fairly simple, but oh so good! With an aromatic combo of garlic and onions and a touch of cream for richness, this delicious and savory soup is the perfect Italian comfort food! I've served this as a first course for family and friends, as well as, a delicious & filling meal for just my husband and I. Try it while the weather is cold and rainy.  I guaranty you'll be glad you did.


What you need:


4 slices crusty Italian bread, 1 1/2 inches thick
4 tablespoons extra-virgin olive oil, plus extra fro drizzling
1 large onion, chopped (my husband has asked for less onion in the serving bowl, but loves the flavor of the broth)
6 garlic cloves, minced
6 cups chicken broth
1/2 cup heavy cream
1 teaspoon minced fresh thyme (or 1/2 teaspoon of dried)
salt and pepper
1/2 cup grated Parmesan cheese (I use shredded)
Directions:
1. Adjust oven rack to middle position and heat oven to 475 degrees. Place bread slices on baking sheet, brush tops with 1 tablespoon oil (give or take, and bake until golden brown and crusty, 8 to 10 minutes.
2. Meanwhile, heat 3 tablespoons oil in Dutch oven (or heavy pot) over medium-high heat until shimmering. Add onion and cook until lightly browned, 8 to 10 minutes. Add garlic and cook until fragrant, about 30 seconds. Add broth , cream, and thyme and simmer until onions are softened, about 10 minutes. Season with salt and pepper to taste.
3. Cut bread into 1-inch chunks and place in soup bowls. Ladle soup over bread, sprinkle with Parmesan (I tend to use a lot of cheese), and drizzle with olive oil. Serve - YUM!


Kitchen Notes:

  • Use day-old or slightly stale bread—it will hold up better than fresh bread when the soup is ladled on.
  • If your soup bowls are ovenproof, place the soup under the broiler for a few minutes just before serving to melt the Parmesan cheese and add a chewy crust.
  • If you prefer, substitute ¼ teaspoon minced fresh rosemary for the thyme.

Thursday, November 12, 2009

Chocolate Crinkles


About a year ago I found this recipe for Chocolate Crinkle cookies.  I don't know why it took me so long to make these little life savers, but I'm so glad I finally did. Truth be told, yesterday was a horrible day at work and I'm pretty sure that chocolate was my only way to self-medicate! These cookies are a little piece of chocolaty heaven.. they (without a doubt) will turn any frown upside down!

Beneath the crackled, powdery surface of these delicious cookie-brownie hybrids, is a soft, chewy, melt in your mouth interior. Don't wait a year to make them, like I did.. These cookies are the perfect  holidays treat!

NOTE: One thing I've learned over the years (the hard way) is to read a recipe completely before starting. For instance, If you were to start this recipe without reading the instructions, you would find that the cookies will take 2 hours longer then you planned, since the dough needs to be refrigerated for two hours before baking... Anyway, this is my helpful hint of the day..

"Chocolate Crinkles"

ingredients

3/4 cup butter, melted
1/2 cup unsweetened cocoa powder (I used Trader Joe's brand)
1 cup of sugar
2 eggs (I use organic and cage free)
2 teaspoons vanilla extract
2 cups of flour
1 teaspoon baking powder
1 teaspoon baking soda (I used Trader Joe's brand)
1/2 teaspoon salt
6 ounces min semisweet chocolate chips (I only had Ghiradelli regular size, so I chopped them down to size)
3/4 cup confectioners' sugar

tools

teaspoon
measuring cup
wire rack
cookie sheet
flat surface (plate) for confectioners' sugar
timer

directions 

In a large bowl, mix together the melted butter, cocoa powder, and sugar. Whisk in the eggs and vanilla extract. In a medium-size bowl, stir together the flour, baking powder, baking soda, and salt. Use a large spoon to slowly add the dry ingredients to the chocolate mixture. Stir in the chips. Refrigerate the dough for 2 hours.

Heat the oven to 350. Form the dough into 1-inch balls, then roll them in confections' sugar. Bake the cookies on an un-greased baking sheet for 10 minutes. Set the baking sheet on a wire rack for 5 minutes. Set the baking sheet on a wire rack for 5 minutes, then lightly dust the cookies with the remaining confectioners' sugar. Transfer the cookies directly onto the rack to cool thoroughly. Makes around 4 dozen (I recommend doubling this recipe...).

Enjoy!

Tuesday, November 3, 2009

Getting Back to Basics...


I know it may seem old fashioned, but every holiday season when I'm baking  in the kitchen, I like to wear my bubbie's kitchen apron (Bubbie is the Jewish term for Grandmother). Wearing her apron makes me feel close to her and it makes me feel like I'm part of something bigger than myself. I enjoy feeling like I'm connected to the history and traditions that have come and gone before me. It is my way of helping the memories live on. That is is also why every year at Chanukah (pronounced Hanaka) I like to make my Bubbie's special "Sour cream Chocolate Cake" and her wonderful "Magic Cookie Bars." These treats bring back warm memories of my loved ones and the holidays that have past.

Whenever I speak to friends and relatives about those they have loved and lost, someone will undoubtedly bring up a food in association with that person they have lost (especially, if it's an aunt, a mother or a grandmother). When friends and family spend time together, their time together frequently takes place around a table. Food is essential to life... and that is why so many of us connect family memories to the special dishes and recipes they shared with those loved ones. This is also why many people hold on to their family recipes so tightly (think about that next time you ask someone for their great-grandmother's strudel recipe).

Tradition is not always spoken about in today's world, but in my humble opinion, traditions are vital for keeping family connections strong, and for making holiday gatherings more than just about the gifts warped in shiny paper. Gifts can come in many shapes and forms, and every year I enjoy the gifts that my grandmother (my Bubbie) passed on to me. She may not know it, but I will never forget.

With the holiday months quickly approaching, let's start a list of baking essentials that may come in handy.  Please email me more suggestions for what to stock up on in the kitchen (just click on the envelope bellow this post). And, please be sure to send in your favorite Thanksgiving, Chanukah and Christmas recipes (or recipe requests) as well!  Here's to spreading cheer with all the holiday sweets we are going to make!


Just print the list and take it with you! 
Trader Joe's is always adding to their baking goods and they offer great quality at a great cost and Walmart offers the best prices on the brands most often used, but If you're seeking quality over price, try Corti Brothers on Folsom Blvd.


Non-Perishables:
Semi-sweet Chocolate (chips/bars/etc...)
Walnuts/Pecans/etc...
Sugar
Oil
Baking Soda
Baking Powder
Cocoa Powder
Cornstarch
Cake Flour
Flour
Brown Sugar
Powdered Sugar (A.K.A. Confectioners Sugar)
Cream of Tarter
Yeast
Frozen Puff Pastry
Vanilla
Coconut (shredded)
Graham cracker Crumbs
Pie Crust
marshmallow Cream
Sweetened Condensed Milk
Splenda
Pumpkin Spic
Nutmeg
Allspice
Cinnamon


Perishables:
Eggs
Half & half
Heavy Whipping Cream
Milk
Butter
Marshmallows
Shredded Coconut
Pecans
Walnuts


Extra Items:
Toothpicks (for testing baking goods)
Good/safe Oven Mitts


My Bubbie & Zaide


Breaded Chicken Roll Ups

Breaded Chicken Roll Ups

STRIP STEAKS WITH BALSAMIC CREAM SAUCE

It really doesn't matter what cut of meat you decide to serve (although, like most things, the better the quality the better the experience), the sauce is what you will remember. Yes it's very simple to make, but it is so delicious (at least I think so).
To complete the meal, I added some freshly steamed green beans in a garlic and butter sauce, and creamy garlic mashed potatoes (using butter, half/half and roasted garlic).


"PERFECT EASY MEAL TO SERVE TO GUESTS, OR AS WONDERFUL MEAL FOR THE FAMILY TO ENJOY"

" TO ENSURE THE MEAT IS SEARED - NOT STEAMED- COOK JUST 3 STEAKS IN THE SKILLET AT A TIME."


Ingredients
3 strip steaks (10 to 12 ounces each), about 1 inch thick
salt and pepper
1 tablespoon vegetable oil
1 shallot, minced
1/4 cup balsamic vinegar
1/3 cup heavy cream
2 tablespoons finely chopped fresh chives

Method
1. Pat steaks dry with paper towels (Julia Child) and season with salt and pepper. heat oil in large skillet over medium-high until just smoking. Cook steaks until well browned, 3 to 5 minutes per side. Transfer to cutting board and tent with foil.

2. Add shallots to empty skillet and cook until softened, about 30 seconds. Stir in vinegar, scraping up and browned bits, and cook until syrupy, about 1 minute. Add cream and cook until slightly thickened, about 1 minute. Stir in chives and season with salt and pepper. Slice steak and serve, passing sauce at table or serve with sauce.

I thoroughly enjoyed the Balsamic Cream Sauce (just ask my husband, he found me in the kitchen after dinner devouring the remains of the sauce from the serving bowl!!).. Let me know if you like it too!!

Pavlova Dessert


My husband and I were invited to a Hanukkah party where we were introduced to some wonderfully unique and tasty dishes. The room was full of warm and friendly people and the hostess offered up a great meal and atmosphere. Duck and fish were the two main courses, served with some very creative and unique side dishes with an Asian flair!

The dessert was what really made the day for me. The hostess was a beautiful and charming gal from New Zealand and she made a traditional New Zealand (or Kiwi) dessert called Pavlova. I highly recommend bringing this dish to a holiday gathering and impressing your friends and family.. The recipe does not call for many ingredients and the method is reads fairly simple. I'm going to attempt to make it for family in the coming weeks (I may have to attempt it a couple of times because though there is a chance it wont turn out the first time, even though the recipe seems pretty simple).

I know it will take practice to get the dessert to turn out as amazing as my friends did, but I'm up for the challenge. If you want to impress friends and family with a sweet and stunning dessert, I highly recommend making a Pavlova cake. We enjoyed this cake served with whipped cream and chocolate mousse (creamy and sweet), but it is traditionally served with fresh fruit and whipped cream. Enjoy!

Pavlova Recipe & Method

Ingredients for Cake:

4 large (120 grams) egg whites

1 cup (200 grams) superfine or castor sugar

1 teaspoon white vinegar

1/2 tablespoon cornstarch (corn flour)

Topping:

1 cup (240 ml) heavy whippingcream

1 1/2 tablespoons (20 grams) granulated white sugar

1/2 teaspoon pure vanilla extract

Fresh fruit - kiwi, strawberries, raspberries, blackberries, passion fruit, peaches, pineapple, or other fruit of your choice. Also can be served with chocolate chips and whipped cream.


METHOD:

Preheat oven to 250 degrees F (130 degrees C) and place rack in center of oven. Line a baking sheet with parchment paper and draw a 7 inch (18 cm) circle on the paper.

In the bowl of your electric mixer, with the whisk attachment, beat the egg whites on medium-high speed until they hold soft peaks. Start adding the sugar, a tablespoon at a time, and continue to beat until the meringue holds very stiff peaks. (Test to see if the sugar is fully dissolved by rubbing a little of the meringue between your thumb and index finger. The meringue should feel smooth, not gritty. If it feels gritty the sugar has not fully dissolved so keep beating until it feels smooth between your fingers). Sprinkle the vinegar and cornstarch over the top of the meringue and, with a rubber spatula, fold in.

Gently spread the meringue inside the circle drawn on the parchment paper, smoothing the edges.

Bake for 1 hour 15 minutes or until the outside is dry and takes on a very pale cream color. Turn the oven off, leave the door slightly ajar, and let the meringue cool completely in the oven. (The outside of the meringue will feel firm to the touch, if gently pressed, but as it cools you will get a little cracking and you will see that the inside is soft and marshmallowy.)

The cooled meringue can be made and stored in a cool dry place, in an airtight container, for a few days.

Just before serving gently place the meringue onto a serving plate. Whip the cream in your electric mixer, with the whisk attachment, until soft peaks form. Sweeten with the sugar and vanilla and then mound the softly whipped cream into the center of the meringue. Arrange the fruit randomly, or in a decorative pattern, on top of the cream. Serve immediately as this dessert does not hold for more than a few hours.

Serves 6 to 8.


Hot cocoa for the winter soul.....


The Saucy Chef here...I am a huge fan of hot cocoa (I'll take a hot cocoa over coffee any day!). In fact, I can drink a good hot cocoa at any time the year. This "almost obsession" started when I was in Rome last October. I happened to order a hot cocoa on a chilly morning at a little cafe just around the corner from our hotel. What I ended up drinking was "liquid bliss!" Although a bit more bitter then what I was used to (sugar packets do the trick), the quality of the chocolate and the richness (and thickness) of the drink took a hold on me (my husband said it was like drinking a melted chocolate bar, and he was right). I have been on a quest to find hot cocoa in the states that compares to the one I sipped in Rome. And, now that the Fall and Winter months are upon us, I am excited to spend my weekends enjoying my new favorite treat! I invite you to begin searching for the sweetest, richest, most luxuries hot cocoas you can find (and share your finds with me). To help you on your way, I recommend starting at Ginger Elizabeth in Midtown Sacramento (no they are not paying me to promote their business). And, by the way, always say yes to whipped cream!

A Cocoa Fact: Cocoa dates back to the Aztecs. To the Aztec's, the cocoa beans were valuable not only for their culinary importance, but also used as a form of currency.

This is a super easy dish to prepare. My husband loves it and asked me to add it to our regular weekly menu. I plan to serve the smaller versions as an appetizer at future dinner gatherings.

I'm always trying to think of new ways to prepare chicken and this dish really fit the bill. I'm going to walk you through the recipe as I prepared it for two (you can always alter the amount of ingredients and seasonings to fit your culinary needs). Chicken is very versatile, as is this dish. The chicken comes out really juicy and full of wonderful flavor. I served it with little red potatoes (baked) and sauteed green beans (w/dill and chopped tomatoes)

Chicken Roll Up Ingredients:

2 large boneless/skinless chicken breasts - each sliced in half (through the middle of the breast) to create 4 pieces (or keep intact for larger individual servings)
1 cup of breadcrumbs (I used Italian seasoned, but you can easily add your own herbs to create your own personal flavor)
Sliced Matzorella cheese (1 to 2 slices per chicken slice)
Fresh Spinach leaves ( 2 to 3 per chicken slice)
Dried Thyme (used in many French dishes)
2 Garlic cloves (crushed)
2 to 3 Tablespoons Butter
Salt (Kosher if you have it)
Pepper

Directions:

Butter a medium size baking dish
Set oven to 400 degrees

-Pound the chicken slightly to flatten
-Dredge one side (outer side) of breast in breadcrumbs
-Sprinkle with Salt & pepper and Thyme on the inner side
-Rub 1/2 teaspoon of crushed garlic on each breast
-Add 1 to 2 slices of cheese
-Place spinach leaves over the cheese
-Roll and insert toothpicks to keep the chicken intact

Place chicken wraps on buttered backing dish (I add a little extra butter - nice and French)
Bake for approximately 30 min

Enjoy!

*Note*
It was easier for me to fill and wrap the chicken and then roll the chicken in the breadcrumbs.